PDF Accessibility
Checking PDFs for accessibility
It is always best to start with an editable source document (ex. Microsoft Word), and run accessibilty scans there. This way, if the document is edited later, the document’s accessibility features will still be intact. When the document is exported to PDF the accessibility features will be passed to the PDF.
Accessibility features will still need to be added to the PDF using Adobe Acrobat using the steps below:
-
Is the document text?
Try selecting text using a mouse, or select all text using Edit > “Select All” from the Acrobat menu. If Not, this is an image file and is not accessible.
Convert this document to text.
-
Run Adobe Accessibility Scan
Run the accessibility checker that is built in to Acrobat.
Select Tools > Accessibility > Full Check then read the report and follow the prompts.
The report lists items in various categories such as Document, Page Content, etc. Each item is preceded by an icon indicating that the item either passes, fails, or requires manual inspection. Right-click on any item to see a list of options for fixing the problem or learning more about it.
-
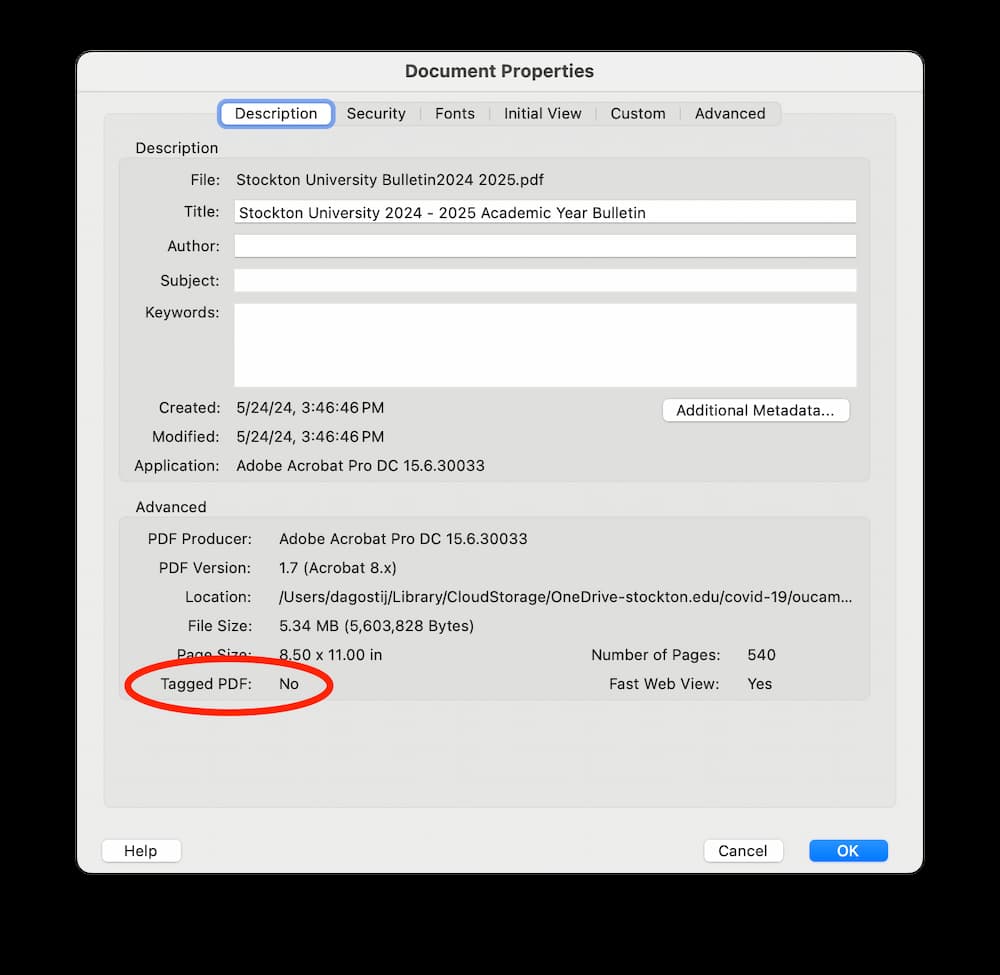
Tagged PDF - Failed
Go to File Properties (Ctrl+D in Windows, Command+D in Mac). In the bottom left corner of the Document Properties dialog, see the “Tagged PDF” field.
If No, this document needs to be tagged. Tags provide the structure on which accessibility is built.
Then, ensure that the option Document is tagged PDF is selected before running the check. Acrobat automatically adds tags to the PDF.
-
Title - Failed
PDF files require a page title for accessibility.
To fix the title automatically, select Title in the Accessibility Checker tab, and choose Fix from the Options menu. Enter the document title in the Description dialog box (deselect Leave As Is, if necessary).
-
Primary Language - Failed
Setting the document language in a PDF enables some screen readers to switch to the appropriate language. This check determines whether the primary text language for the PDF is specified. If the check fails, set the language.
To set the language automatically, select Primary Language in the Accessibility Checker tab and then choose Fix from the Options menu. Choose a language in the Set Reading Language dialog box, and then select OK.
-
Alternate Text - Failed
Make sure that images in the document either have descriptive alternate text or are marked as artifacts.
Select Figures Alternate Text in the Accessibility Checker panel, and choose Fix from the Options menu. Add alternate text as prompted in the Set Alternate Text dialog box.
-
Tab Order - Failed
Because tabs are often used to navigate a PDF, it's necessary that the tab order parallels the document structure.
To fix the tab order automatically, select Tab Order on the Accessibility Checker panel, and choose Fix from the Options menu.
-
Headings Appropriate Nesting - Failed
This rule checks nested headings. When this check fails, headings are not nested properly.
To fix the list structure, find the list in the Accessibility Checker panel by right-clicking (Windows) or Ctrl-clicking (macOS) the failed element and choosing Show in Tags Panel.