Network Connection
🛜 Wireless Network Access
Connect your devices to Stockton University's wireless networks easily.
Follow the step-by-step instructions below to get started by choosing your preferred
connection type. for Chromebooks, gaming consoles, and steaming devices - See section
below
Faculty, Staff, & Students
Long term network access that provides a continuous connection for members of the
Stockton community.
-
Step 1
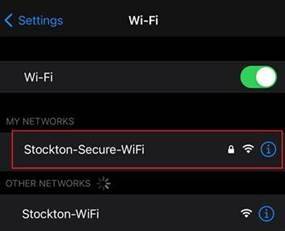
Select "Stockton-Secure-WiFi" from available networks
-
Step 2
🔐 Enter your GoPortal username and password when prompted
-
Step 3
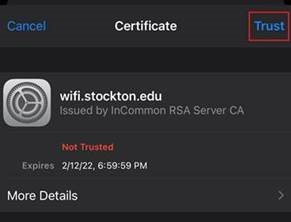
✔️ Accept the security certificate if requested
-
Connected!
🔁 Your device will now connect automatically on campus until you change your GoPortal
password!
ℹ️ Stockton GoPortal users can connect up to 3 devices simultaneously.
|
Guests & Campus Visitors
Quick network access instructions for guests and campus visitors.
-
Step 1
Select "Stockton-WiFi" from
available networks
-
Step 2
📲 Open your web browser
-
Step 3
☑️ Accept the Acceptable Use Policy
-
Connected!
🕰️ You will have internet access for 12 hours.
After 12 hours you will have to follow these steps again to regain access to the Internet.
⚠️ Stockton's guest network has limited bandwidth and access to internal resources.
|
🗃️ Device-Specific Connection Guides
Need help connecting your device?
Select your device type below to view easy, step-by-step instructions with visuals.
Apple Devices
Apple Mobile Devices
|
Some Apple features such as Handoff or Sidecar can affect your device's wireless network performance.
If you experience slow or unreliable connections while using our network, please contact the ITS Help Desk for additional support.
|
- Select Settings
- Select WiFi
- Under Choose a Network, select Stockton-Secure-WiFi
- Enter your Username and Password and select Join

- When prompted, select Trust on the wifi.stockton.edu certificate

Includes iPad, iPhone, and iPod.
|
Apple Laptops / Computers
- Click the Apple Logo in the top-left
- Select System Preferences
- Click Network and select WiFi from the left
- Select Stockton-Secure-WiFi from the Network list
- Enter your Username and Password and select Join
- Click Apply and close the configuration window
Includes Mac, Mac Pro, MacBook, MacBook Pro, and MacBook Air.
|
|
Windows Devices
Windows 10
- Select Settings
- Select Wi-Fi
- Ensure Wi-Fi networking is on
- Select Stockton-Secure-WiFi
- Enter your Username and Password and select Connect
- If you are prompted for a certificate, choose Accept
|
|
Android Devices
Android Mobile Devices
-
- Select Apps
- Select Settings
- Select WiFi
- Under WiFi Networks, select Stockton-Secure-WiFi
- Enter the following settings:
EAP Method: PEAP
Phase 2 Auth: MSCHAPV2
CA Certificate: Use system certificates
Minimum TLS version: TLS v1.0
Online Certificate Status: Do not validate
User Certificate: Unspecified
Domain: stockton.edu
Identity: [Your Username]
Anonymous Identity: [Your Username]@ac.stockton
Password: Your Password
6. Uncheck verify server certificate if applicable
If any settings are not available to be configured, ignore those settings listed here.
|
|
|
Chromebooks
Chromebook
- Click on the Quick Settings Panel at the bottom right of your screen
- Click on “no-network”
- Select the Stockton-Secure-WiFi network
- Enter the following settings:
EAP Method: PEAP
Phase 2 Auth: MSCHAPV2
CA Certificate: Use system certificates
Minimum TLS version: TLS v1.0
Online Certificate Status: Do not validate
User Certificate: Unspecified
Domain: stockton.edu
Identity: [Your Username]
Anonymous Identity: [Your Username]@ac.stockton
Password: Your Password
6. Uncheck verify server certificate if applicable
If any settings are not available to be configured, ignore those settings listed here.
|
|
🧑💻 Internet Access Resources
Information on low-cost home internet programs and public WiFi locations.
Explore tools to compare internet providers, check available speeds, or find national
businesses offering free WiFi nearby.
Compare High Speed Internet Providers
Highspeedinternet.com has thousands of internet providers in their database. You can
find the perfect match for your area, budget, and speed needs.
Enter your zip code on their website to see every internet option in your area, or
find out how much internet speed you need.
National Chains with Free WiFi
Many national chains offer complimentary WiFi to customers at no additional cost.
These locations can be useful for students or individuals who need quick, reliable
internet access while on the go.
You can view a list of common national chains that provide free WiFi, including coffee
shops, fast food restaurants, and retail stores.
🏫 Housing Connection
Internet Access Options for On-Campus Housing
Students residing on campus can connect to Stockton's LAN for very fast Internet access. An ethernet cable and a computer with an available
network jack are required. Stockton’s wireless network also supports many gaming consoles and entertainment devices. Please note: downloading copyrighted material illegally violates the Acceptable Usage Standards and federal law.
The following types of devices are not supported on Stockton WiFi networks:
- 🖨️Network Printers
- 💡Smart Home Devices like security cameras, smart bulbs, smart plugs, roombas, etc.
- 📶Devices that rely on Network Discovery protocols to operate, such as those needing
a companion mobile app on the same network.
These are often built for consumer-grade home networks and may rely on unsupported
protocols.
🎮 Gaming & Media Devices
Need to Game or Stream? Here's How to Connect
Students on campus can connect game consoles and media streaming devices using Stockton's
NetRegsystem.
You will need your device's MAC address. Below, you will find instructions for locating
the MAC address for various devices that can be registered on the network.
Playstation Consoles
Playstation 5
- From the home screen, select the gear icon (settings) in the upper right.
- Select System.
- Select "Console Information".
- Note the MAC address (Wi-Fi) displayed at the bottom of the list.
|
Playstation 4
- Turn on your Playstation 4 without any disk in the drive and wait for the menu to
pop up.
- Navigate to the "Settings" icon (located on the far left).
- Select the "System" icon under the Settings menu.
- Select "System Information."
|
|
Xbox Consoles
Xbox
- Navigate to My Games and Apps
- Select Settings.
- Select Network.
- Select Advanced Settings.
- The MAC Addresses for the wired and wireless adapters should be displayed.
|
|
Nintendo Consoles
Switch & Switch 2
- Select "System Settings" from the HOME Menu.
- Scroll down through the menu and select "Internet."
- The Nintendo Switch console's MAC address will be listed under "System MAC Address."
|
Wii U
- From the Wii U Menu, select "System Settings."
- Using the Left Stick select the "Internet" icon and press the A Button.
- Select "View MAC Address" and wait a moment for the MAC address to be displayed.
- When you are finished, tap "Back."
|
3DS
- From the HOME menu, highlight and select the System Settings Icon.
- Select "Internet Settings."
- Tap "Other Information."
- Tap "Confirm MAC Address." Your system's MAC Address will be displayed on the screen.
|
|
Amazon Alexa & Fire TV
Fire TV/Stick
- From the Main Menu go to Settings
- Select "System"
- Then go to "About"
- Toggle down to Network
- Look for the MAC Address (Wi-Fi)
|
Alexa/Echo
- In the Alexa app, open the left navigation panel and then select Settings.
- Select your device and then select Update Wi-Fi. OR If you're adding a new device
to your account, select Set up a new device instead.
- On your Echo device, press and hold the Action button until the light ring changes
to orange. Your mobile device will then connect to your Echo device.
- A list of available Wi-Fi networks appear in the app.
- Select ANY Wi-Fi network. Scroll down on this screen until you see the mac address.
|
|
Google Home
Google Home
- Connect to your Google Home using bluetooth.
- Once connected begin the process to connect to Wi-Fi.
- After you pick the room you are installing the Google Home in and select a Wi-Fi network,
press the three vertical dots in the upper right corner of the screen while the Google Home is searching for the
network. An option to view your MAC address should appear, and after pressing that,
the app should display the MAC address.
|
|
Roku
Roku
- From the Roku home screen, select Settings.
- From the Settings screen, select Player Info.
|
|
Apple TV
Apple TV
- Go to the main menu on your Apple TV, and select "Settings."
- In the Settings Menu, select "About."
- Here you can find your MAC Address, listed as either the "Wireless" or "Ethernet"
(depending on the connection you are using).
|
|


